No Programming, No Life!I really love programming with Ruby, Java and JavaScript.2020-02-09T07:28:44.819Zhttps://blog.morizyun.com/morizyuneHexoEffective Procedures to Setup new Mac Majove For JSer/Rubyisthttps://blog.morizyun.com/blog/setup-procedure-develop-ruby-rails-mac-mojave/2019-12-01T05:00:00.000Z2020-02-09T07:28:44.819ZThis article describes effective procedures for developer with Ruby/Java/JavaScript to setup Mac Majove.
# Setting to installing gems when introducing new version git clone https://github.com/sstephenson/rbenv-default-gems.git ~/.rbenv/plugins/rbenv-default-gems
]]>
<p>This article describes effective procedures for developer with Ruby/Java/JavaScript to setup Mac Majove.</p>
Effective Procedures to Setup new Mac High Sierra For JSer/Rubyisthttps://blog.morizyun.com/blog/setup-procedure-develop-ruby-rails-mac-sierra/2018-09-14T04:00:00.000Z2018-10-01T13:29:05.000ZThis article describes effective procedures for JSer / Rubyists to setup High Sierra of macOS.
# Setting to installing gems when introducing new version git clone https://github.com/sstephenson/rbenv-default-gems.git ~/.rbenv/plugins/rbenv-default-gems
]]>
<p>This article describes effective procedures for JSer / Rubyists to setup High Sierra of macOS.</p>
Basic tutorial for Scrapy [Scraping framework]https://blog.morizyun.com/blog/scrapy-scraping-crawler-python-library/2018-07-25T04:00:00.000Z2018-07-19T22:36:54.000ZScrapy is scrapying OSS tool for extracting the data you need from websites. In addition, Scrapy Cloud - Scrapyinghub is a powerful and useful platform to run Scrapy cralwer. This article describes basic tutorial for Scrapy.
Installation
Install Scrapy and Scrapyinghub library at the first time:
pip install scrapy shub
After then, please create a new project for Scrapy:
scrapy startproject PROJECT_NAME
cd PROJECT_NAME
Create Spider
In scrapy, you create some spiders which is crawler in a project. You can create the spider by the following command:
# Generate code to scrape a new site
scrapy genspider blogsider blog.scrapinghub.com
After the above command, please change spiders/blogsider.py:
import scrapy
classBlogSpider(scrapy.Spider): name = 'blogspider' allowed_domains = ['blog.scrapinghub.com'] start_urls = ['https://blog.scrapinghub.com']
defparse(self, response): for title in response.css('h2.entry-title'): yield {'title': title.css('a ::text').extract_first()}
for next_page in response.css('div.prev-post > a'): yield response.follow(next_page, self.parse)
So, your spider can get title in entry list.
Run the cawler in local
You can execute your crawler on local:
# Execute scraping in local
scrapy crawl blogspider
Get API Key on Scrapinghub
If you create an account on Scrapy Cloud - Scrapyinghub, you can deloy your code to there and execute it on theere.
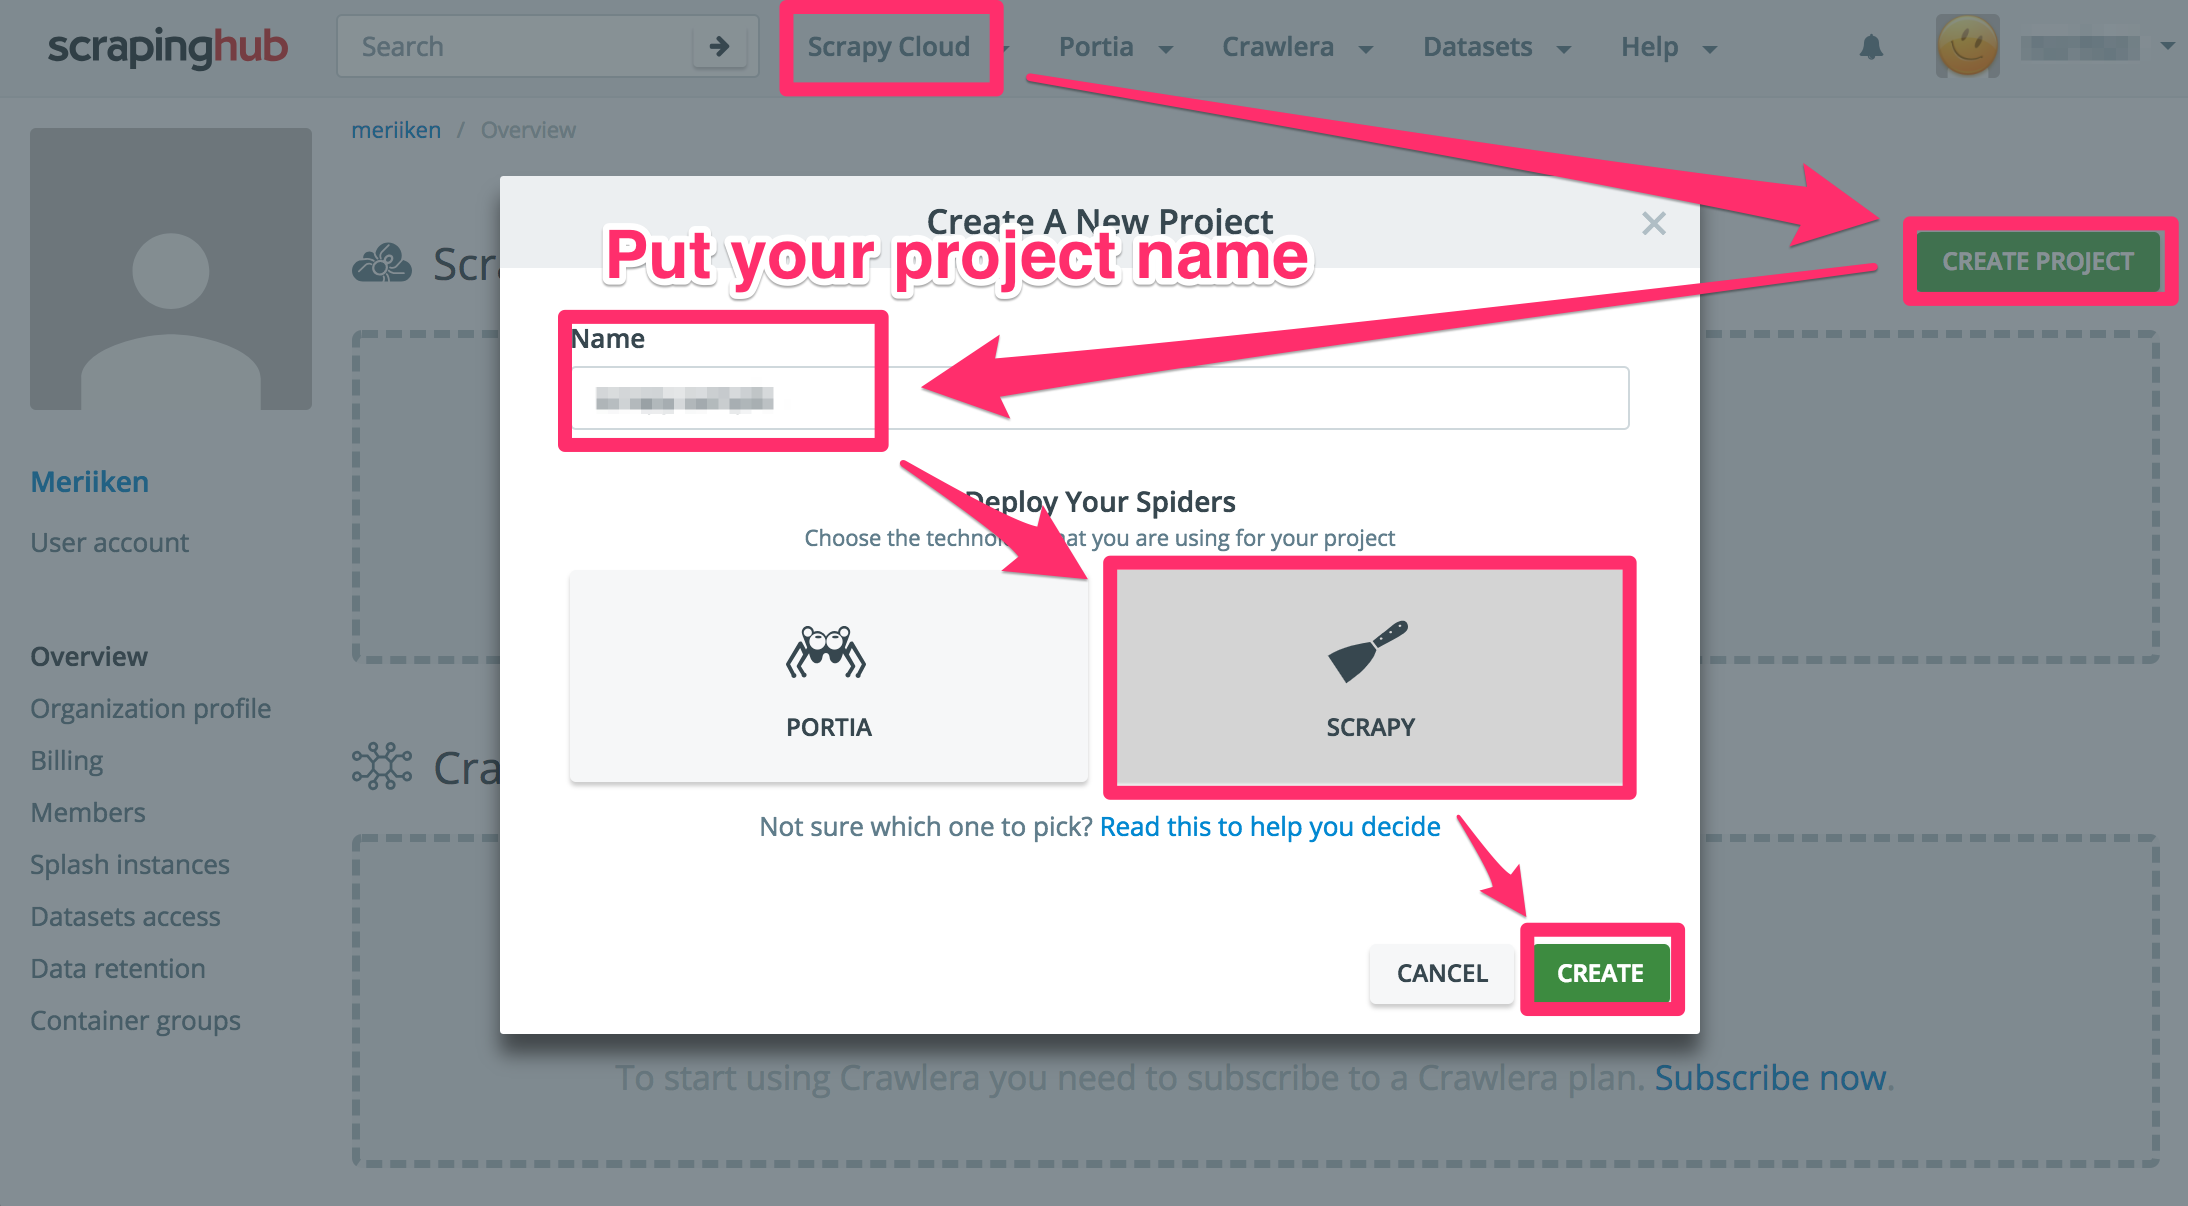
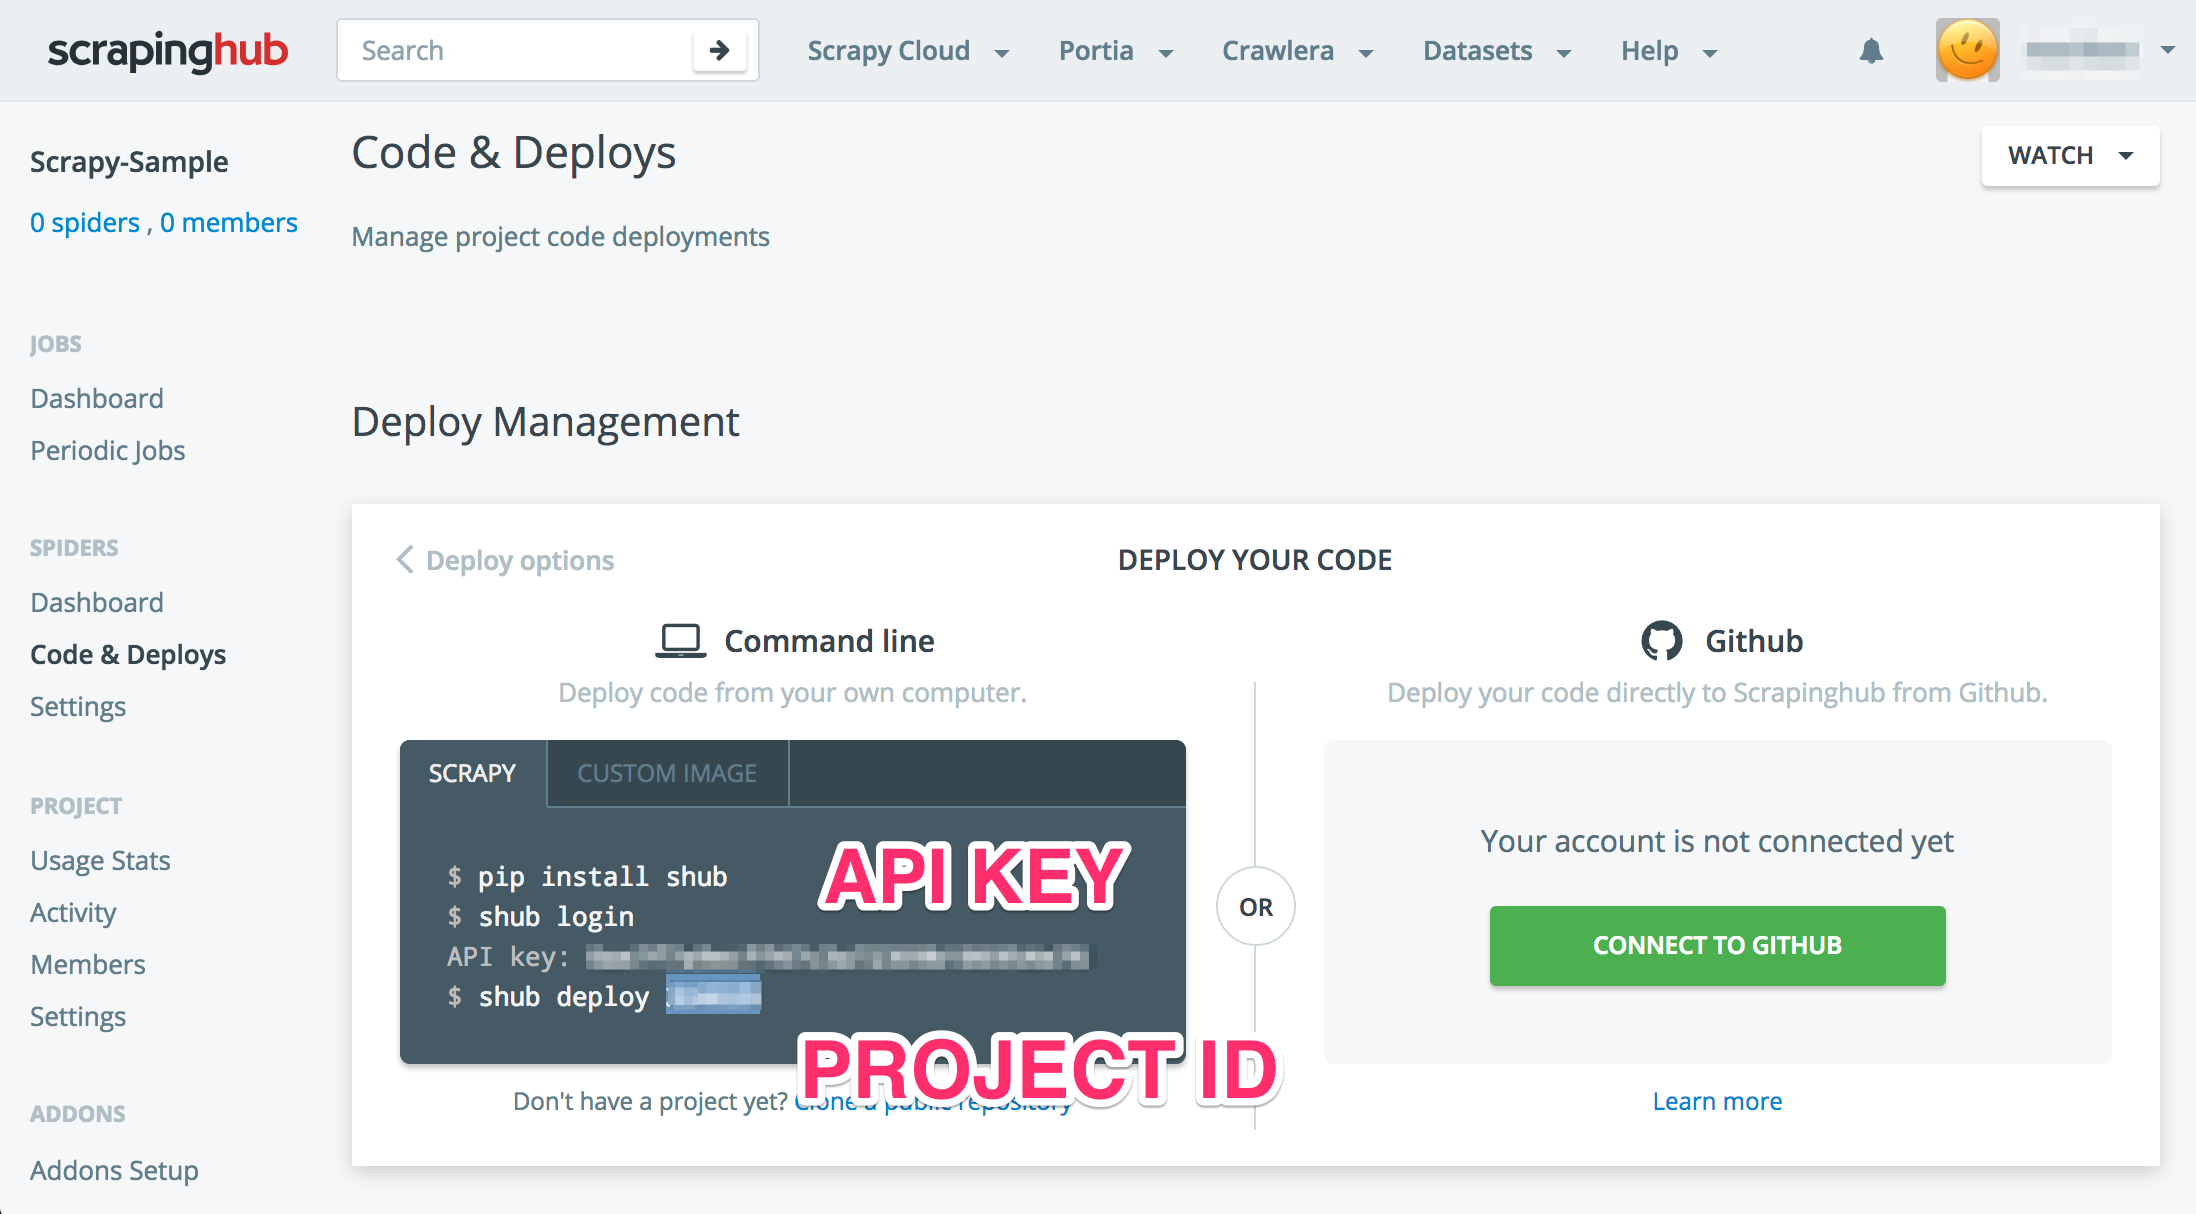
After creating the account, please create project and confirm API key and Project Id.
Please set your project id and stack information which you want to use. If you want to know more detail of stack information, please see shub/deploying.
Deploy to Scrapyinghub
Let’s deply your code to Scrapyinghub with the API key:
# Install a library for scrapying hub pip install shub
# Logging in Scrapinghub with <API Key> shub login
# Deploy to Scrapinghub shub deploy # Deploy the spider to Scrapy Cloud
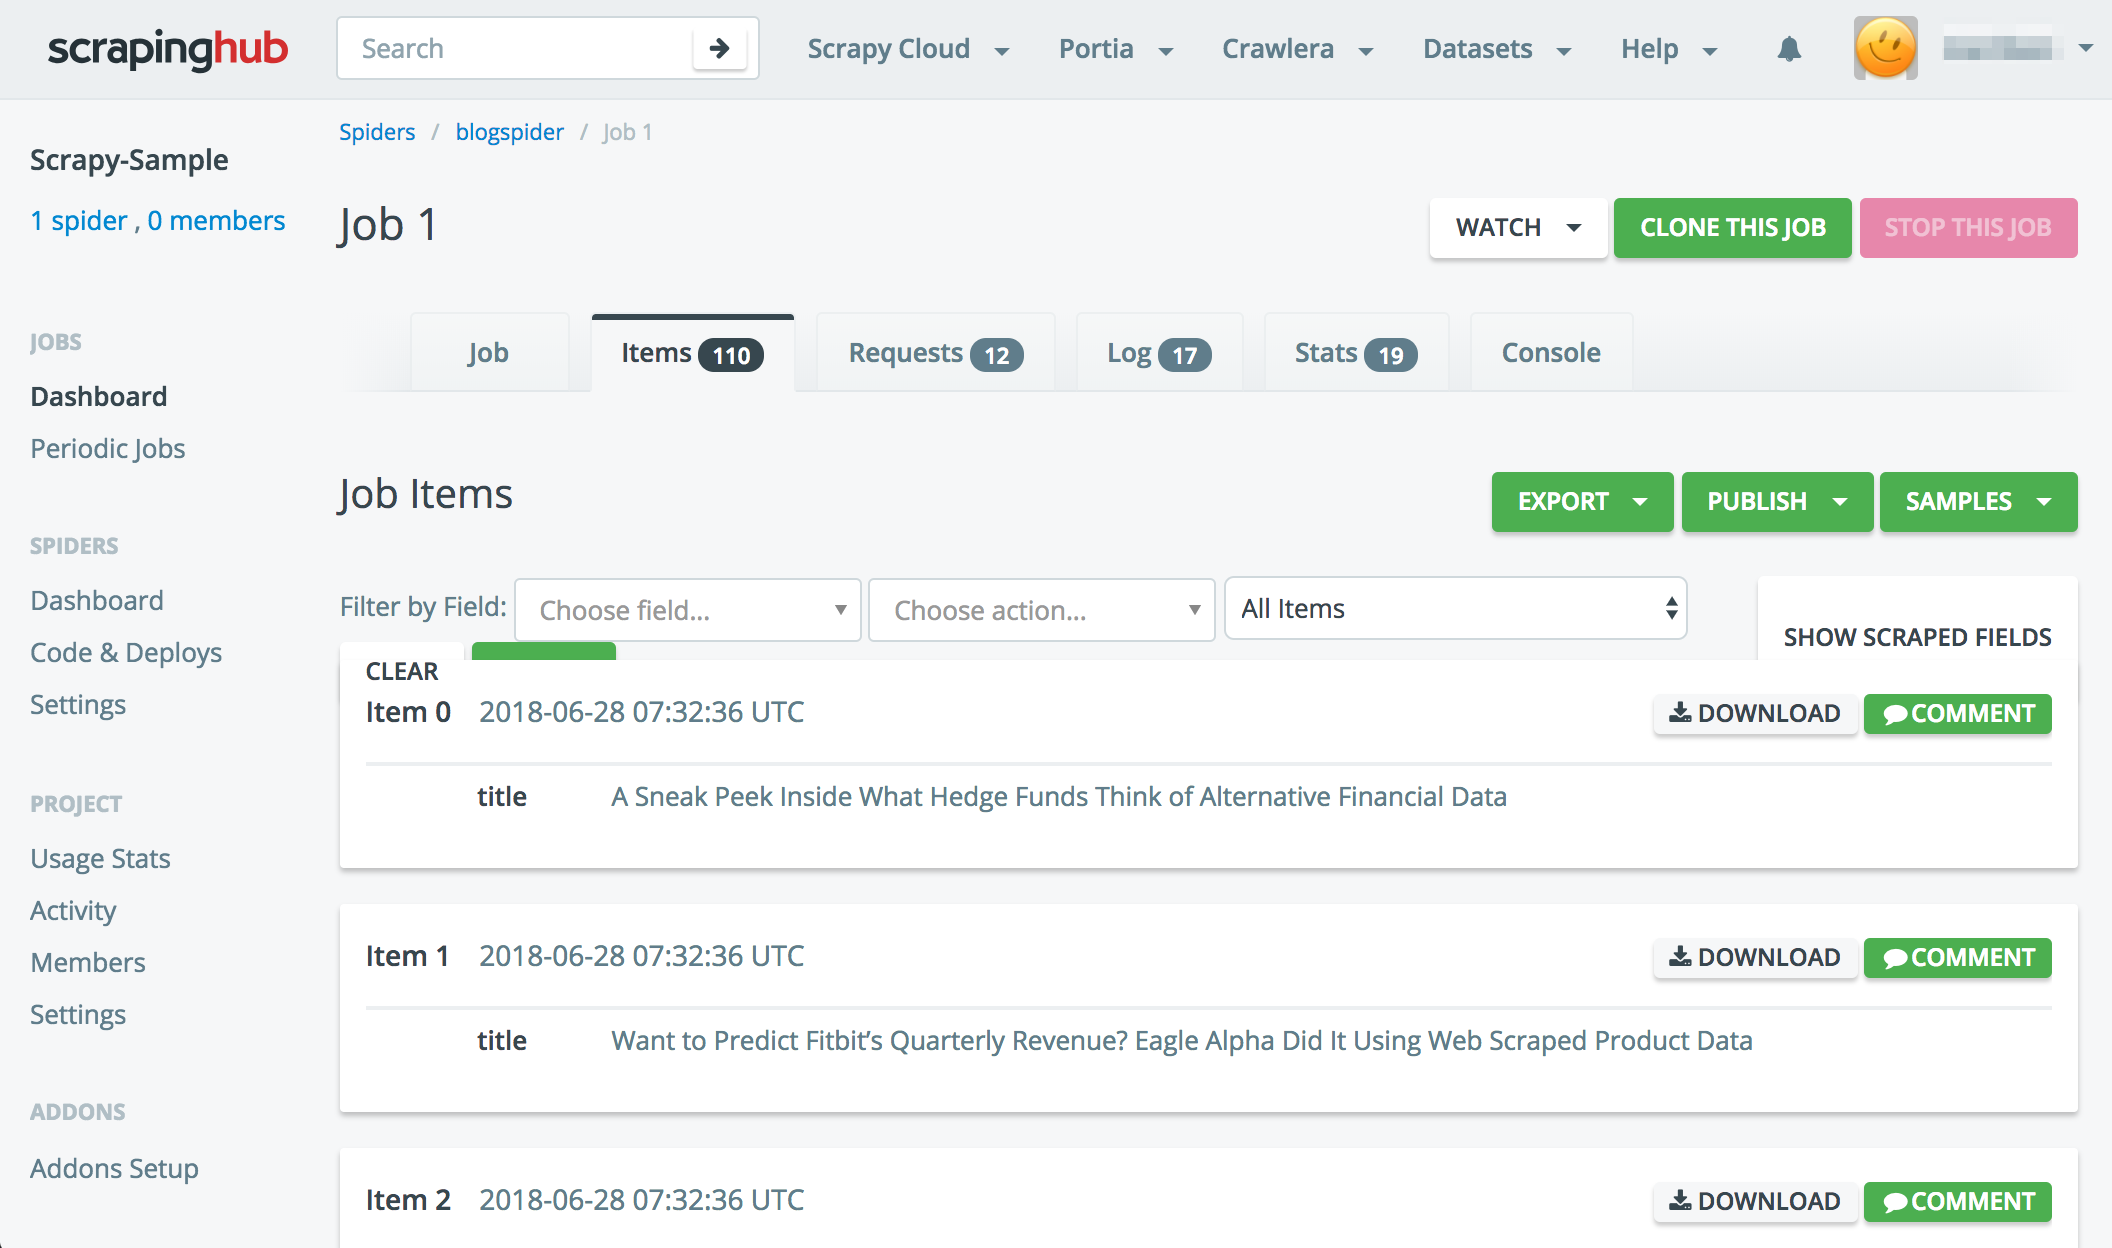
# Execute spider on Scrapinghub shub schedule blogspider
After then, you can confirm the result items by Scrapyinghub screen.
It can add job_id, spider_name, created_at, etc to items.
Monitoring
Monitor spiders and item validation check
Enable to define scrapy stats values
Get email and slack notifications
DotScrapy Persistence
Allows the crawler to access a persistent storage and share data among different runs of a spider by S3
It ignore duplicated URL among some jobs of a spider.
It is difficult to recover error sometimes, so please be careful to use it.
]]>
<p><strong><a href="https://scrapy.org/" target="_blank" rel="noopener">Scrapy</a></strong> is scrapying OSS tool for extracting the data yo
Grammer Tips for Python 3https://blog.morizyun.com/blog/python-basic-grammer-tips/2018-07-23T04:00:00.000Z2018-07-26T06:16:59.000ZIn this article, I would like to share some Python Grammer tips for beginner.
String
In Python, there are two type of string.
str = u'...'
A sequence of Unicode characters (UTF-16 or UTF-32). It can recognize one character as one character.
bytes = b'...'
A sequence of one byte data (integers between 0 and 255)
number=5
text='test'
'Number is {0}、text is {1}'.format(number, text)
Search a substring
s = "This be a string" if s.find("is") == -1: print"No 'is' here!"
if"is"in s: print"No 'is' here!"
Replace substring
This method returns a copy of the string with all occurrences of substring old replaced by new.
str = "this is string example....wow!!! this is really string"
print str.replace("is", "was") #=> thwas was string example....wow!!! thwas was really string
print str.replace("is", "was", 3) #=> thwas was string example....wow!!! thwas is really string
Trim whitespace
' Hello '.strip() #=> 'Hello'
' Hello'.strip() #=> 'Hello'
'Bob has a cat'.strip() #=> 'Bob has a cat'
Embedding variable in Python 3.6 or later
a = 'sample'
print(f'{a}') #=> 'sample'
List/Array
List comprehension
A list comprehension consists of the following parts:
An Input Sequence.
A Variable representing members of the input sequence.
An Optional Predicate expression.
[i for i in range(10)] #=> [0, 1, 2, 3, 4, 5, 6, 7, 8, 9] [i for i in range(10) if i%2==0] #=> [0, 2, 4, 6, 8] [ i if i%2==0else str(i) for i in range(10)] #=> [0, '1', 2, '3', 4, '5', 6, '7', 8, '9']
r'...' is literal for Regex. It is better to use it for Regex.
import re

m = re.search(r'(?<=-)\w+', 'spam-egg')
m.group(0) #=> 'egg'
p = re.compile('name (.*) is valid')
s = """
someline abc
someother line
name my_user_name is valid
some more lines"""
p.findall(s) #=> ['my_user_name']
string.replace with regular expression
import re

line = re.sub(
           r"(?i)^.*interfaceOpDataFile.*$",
           "interfaceOpDataFile %s" % fileIn,
           line
       )
Remove specific pattern from text
This is example for removing HTML tags/formatting from a string:
import re defstrip_html_tag(data): p = re.compile(r'<.*?>') return p.sub('', data)
strip_html_tag('<a href="foo.com" class="bar">I Want This <b>text!</b></a>') #=> 'I Want This text!'
Datetime
Now
import datetime
datetime.datetime.now()
String to Datetime
pip install dateutil and add the following code:
from dateutil import parser
dt = parser.parse("Aug 28 1999 12:00AM")
Convert unix timestamp to readable date
from datetime import datetime

# No miliseconds
datetime.fromtimestamp(1172969203.1)

# With miliseconds
s = 1236472051807 / 1000.0
datetime.fromtimestamp(s).strftime('%Y-%m-%d %H:%M:%S.%f') #=> '2009-03-08 09:27:31.807000'
Get current time in milliseconds
import time
millis = int(round(time.time() * 1000))
print millis
end = 0 whileTrue: idx = WHITESPACE.match(s[end:]).end() i = end + idx if i >= size: break ob, end = decoder.raw_decode(s, i) yield ob
Generate CSV file
Generate CSV file from list(array):
import csv

items = [
    ['John', 28],
    ['Sara', 22]
]

with open('/app/job_items.csv', 'w', encoding='utf8') as f:
    wr = csv.writer(f, quoting=csv.QUOTE_ALL, lineterminator='\n')
    wr.writerow(['name', 'age'])
    for i in items:
        wr.writerow(i)

        # Write string data as CSV
        # csvwriter.writerow([i])
]]>
<p>In this article, I would like to share some Python Grammer tips for beginner.</p>
<h2 id="String"><a href="#String" class="headerlink" ti
Basic tutorial for Django with Docker[Python3]https://blog.morizyun.com/blog/python-library-django-docker-basic-tutorial/2018-07-07T04:00:00.000Z2018-07-27T07:23:29.000ZDjango is the most famous web framework for Python. In this article, I would like to share basic tutorial of Django for beginner.
defbook_edit(request, book_id=None): if book_id: book = get_object_or_404(Book, pk=book_id) else: book = Book()
if request.method == 'POST': form = BookForm(request.POST, instance=book) if form.is_valid(): book = form.save(commit=False) book.save() return redirect('cms:book_list') else: form = BookForm(instance=book)
]]>
<p><strong><a href="https://www.djangoproject.com/" target="_blank" rel="noopener">Django</a></strong> is the most famous web framework for
Basic tutorial for BigQuery with Pythonhttps://blog.morizyun.com/blog/library-bigquery-google-cloud-python/2018-07-04T04:00:00.000Z2018-07-07T10:53:29.000ZBigQuery is a fully-managed enterprise data warehouse for analystics. It is cheap and high-scalable. In this article, I would like to share basic tutorial for BigQuery with Python.
You can add description or required option to schema information.
BQ_TABLE_SCHEMA = [
    bigquery.SchemaField('age', 'INTEGER', mode='REQUIRED', description='Age'),
    bigquery.SchemaField('name', 'STRING', description='Name'),
    bigquery.SchemaField('created_at', 'TIMESTAMP', mode='REQUIRED', description='Date and time when the record was created')
]
]]>
<p><strong><a href="https://cloud.google.com/bigquery/" target="_blank" rel="noopener">BigQuery</a></strong> is a fully-managed enterprise d
Serverless framework for Node.js/Python with Dockerhttps://blog.morizyun.com/blog/javascript-serverless-framework-aws-lambda-python-docker/2018-06-28T04:00:00.000Z2018-07-23T10:07:20.000ZServerless is toolkit for deploying and operating serverless framework due to focus your application. In this article, I would like to introduce how to build basic lambda API by Node.js/Python with Docker.
Installation
yarn global add serverless

# Create project folder (e.g. serverless-sample)
mkdir serverless-sample
cd serverless-sample
Docker Config for Python
If you want to develop a function with Python, it is better to use Dockerfile, because it is easy to use pip library in lambda.
@@ -63,6 +63,6 @@ functions: # Check the event documentation for details -# events: -# - http: -# path: users/create -# method: get + events: + - http: + path: users/create + method: get # - s3: ${env:BUCKET}
Confirm developing function
Enable to confirm your devloping function on local
# Call the function
sls invoke local -f hello
Deploy code to AWS
After development, you can deploy your code by one command:
sls deploy -v
Confirm the deployed function
Enable to confirm your devloping function on local or you can call your API by curl:
# Call the function
sls invoke -f hello

# Call the function's API by curl
curl https://xxx.execute-api.ap-northeast-1.amazonaws.com/dev/users/create
Add pip libraries for lambda
If you want to use library, please install pip libraries as follows:
# In docker
pip install requests -t /app/lib/requests
Remove deployed function
sls remove
Configuration (serverless.yml)
Memory Size, Timeout, etc in AWS lambda
You can configure memory size and timeout for function in AWS lambda:
# https://serverless.com/framework/docs/providers/aws/guide/functions/ provider: name:aws runtime:python3.6 memorySize:128# optional, in MB, default is 1024 timeout:10# optional, in seconds, default is 6
Please configure including/excluding a file or a folder.
# you can add packaging information here # https://serverless.com/framework/docs/providers/aws/guide/packaging/ package: exclude:# excluding file or folder -src/** include:# including file or folder -src/function/handler.js
A deploy command (serverless deploy) is simple and useful to create the required IAM, set up CloudWatch logs, set up S3 for deployment, deploy, etc.
Cron (CloudWatch Events) needs just a line to YAML, there are a lot of useful configurations.
I thought that it was easy for using Google Cloud Function to manage credential on GCP, I tried a little, but it was buggy. I think that serverless is useful in only AWS lambda.
There are some problems in GCF and serverless. Also, GCF is beta yet.
# In AWS lambda, you can write only /tmp folder credential_file = os.environ['APPLICATION_CREDENTIALS'] with open(credential_file, 'w', encoding='utf8') as f: print('Credential file {} created.'.format(credential_file)) f.write(credential_data)
]]>
<p><strong><a href="https://serverless.com/" target="_blank" rel="noopener">Serverless</a></strong> is toolkit for deploying and operating s
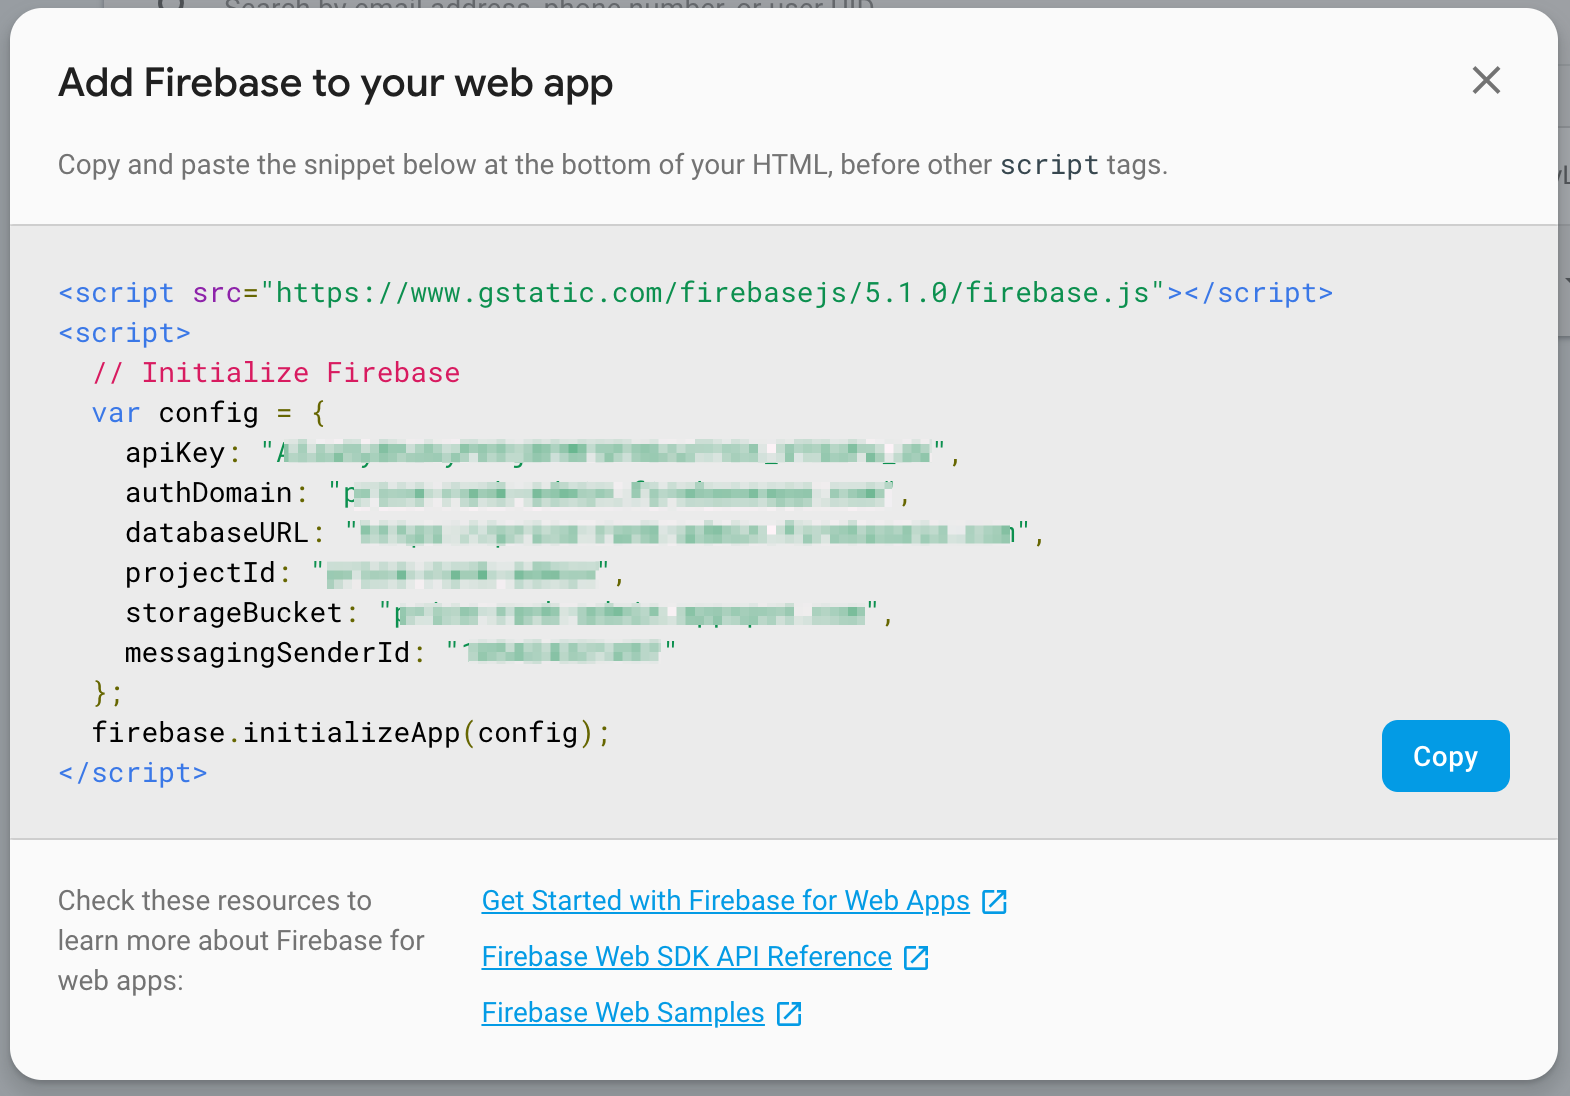
create-react-app with Redux & TypeScript & Firebase Authentication [JavaScript]https://blog.morizyun.com/blog/typescript-tutorial-react-app-redux-firebase-authentication/2018-06-27T04:00:00.000Z2018-07-19T08:13:39.000ZLet’s implement a whole authentication mechanism in React & Redux with sign up, sign in, password reset, change password and sign out in TypeScript.
]]>
<p>Let’s implement a whole authentication mechanism in React & Redux with sign up, sign in, password reset, change password and sign out
Initial Setup with Jest & TypeScript [JavaScript]https://blog.morizyun.com/blog/typescript-jest-unit-test-zero-config/2018-06-21T04:00:00.000Z2018-07-30T07:08:58.000ZJest is JavaScript test framework which is less configuration.
This article describes how to setup Jest with TypeScript.
Install libraries
yarn add --dev jest ts-jest @types/jest
Configure Jest
Modify package.json to add run test configuration. (If you want to run test sequentially, please use jest --runInBand.)
]]>
<p><strong><a href="https://facebook.github.io/jest/" target="_blank" rel="noopener">Jest</a></strong> is JavaScript test framework which is
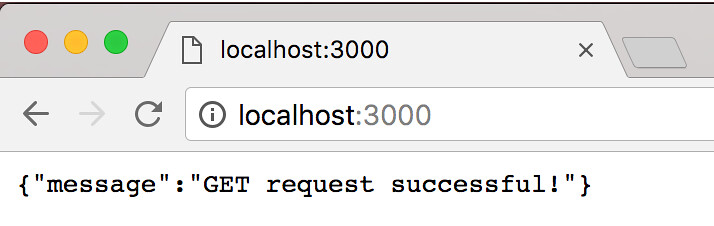
Tutorial of RESTful APIs with Express.js and TypeScripthttps://blog.morizyun.com/blog/typescript-express-tutorial-javascript-nodejs/2018-06-09T04:00:00.000Z2018-06-23T18:40:38.000ZThis is a tutorial about how to build RESTful APIs with Express.js and TypeScript.
Prepare Node env on macOS
If you don’t have a development environment for Node.js, I recommend installing nvm. If you are interested, please see my post nvm: Node Version Manager .
Install TypeScript
Before we get started, we should install TypeScript and TypeScript Node:
]]>
<p>This is a tutorial about how to build RESTful APIs with Express.js and TypeScript.</p>
<h2 id="Prepare-Node-env-on-macOS"><a href="#Prepa
Beiginner's guide for Big O notationhttps://blog.morizyun.com/blog/computer-sience-big-o-notation-beginner-guide/2018-01-06T05:00:00.000Z2018-01-06T11:00:14.000ZBig O notation describes the performance or complexity of an algorithm. It shows the worst-case scenario and the execution time required or the storage space used by an algorithm too.
Hopefully, this article will help you understand the basic of Big O notation with JavaScript sample code.
O(1)
O(1) shows the execution time(or space) of an algorithm is always same regardless of the size of the input data set.
O(N) illustrates an algorithm’s performance will grow linearly and in direct proportion to the size of the input data set. The example is as follows:
functionfindValue(elements, expect) { for (let e of elements) { if (e === expect) { returntrue; } } returnfalse; }
In Big O notation, we should always assume the upper limit where the algorithm will perform the maximum number of iterations. So, in that case, the worst case is return false after finishing the loop.
O(N**2)
O(N**2)(N squared) describes an algorithm whose performance is directly proportional to the square of the size of the input data set. This is common with algorithms that involve nested iterations. O Notation of deeper nested iteration will be O(N**3), O(N**4) or etc.
O(log N) algorithm like the binary search denotes produces a growth curve that peaks at the beginning and slowly flattens out as the size of the data sets increase. This makes algorithms extremely efficient when processing with large data sets.
]]>
<p><strong>Big O notation</strong> describes the performance or complexity of an algorithm. It shows the worst-case scenario and the executi
https://blog.morizyun.com/blog/javascript-node-js-security-tips/2018-01-02T05:00:00.000Z2018-10-06T09:08:50.000Ztitle: “Security Tips for Node.js”
In this post, I will share some points that you should keep in mind in coding.
No eval
If eval get user input, it can open up your code for injection attacks and it is slow as it will run the interpreter/compiler.
Declare use strict
To invoke strict mode, write use strict; statement before any other statements;
You can opt-in to use a restricted variant and eliminate (Undeletable properties, Object literals must be unique, etc)
"use strict";
// do something
No sudo node app.js
Your process can bring down the entire system, as it will have a credential to do anything if you use sodo node app.js. Please set up an HTTP proxy/server (Nginx, Apache) to forward a request.
Avoid command injection
Fo example, child_process.exec makes a call to execute /bin/sh.
Pay attention tmpfile
Please pay extra attention to tmpfile, like handling uploading files. These files can easily eat up all your disk space.
Use HttpOnly cookie
By default, cookies can be read by JS on your same domain. This mean is dangerous in case of Cross-Site Scripting & any third-party JS library can read them. So, you should set HttpOnly flag on a cookie.
Use helmet in Express
helmetjs/helmet help secure Expres apps with various HTTP header, for example CSP, crossdomain, xframe, xssfilter and much more.
Node Security Project is a great tool that can check your used modules for know vulnerabilities. The tool adds security checks right into your GitHub pull request flow.
Snyk is sililar to the Node Security Project, so please check it too.
Use Retire.js
The goad of Retire.js is to help deletet use of version with known vulnerabilities.
]]>
<h2 id="title-“Security-Tips-for-Node-js”"><a href="#title-“Security-Tips-for-Node-js”" class="headerlink" title="title: “Security Tips for
Helpful Tips for React.jshttps://blog.morizyun.com/blog/javascript-react-helpful-tips/2017-12-23T05:00:00.000Z2018-09-23T04:02:27.000ZIn this article, I will introduce helpful tips to improve React development efficiency.
]]>
<p>In this article, I will introduce helpful tips to improve React development efficiency.</p>
<h2 id="Remove-bind-this"><a href="#Remove-bi
Scraping by using CasperJS[JavaScript]https://blog.morizyun.com/blog/casper-js-scraping-headless-browser/2017-01-08T05:00:00.000Z2017-12-16T02:34:32.000ZIt is a tips that you can use when you want to scrape a page using JavaScript. Since CasperJS can be instaled easily by npm, it is recomended to use in sever side.
Installation
Installation command for CasperJS is as follows:
npm install casperjs -g
Source Code
The following code is a a script to scrape web page by using CasperJS. In this case, I tried to be able to scpecify URL to scrape and a destination to save scraped HTML.
// scrape.js var casper = require('casper').create(); casper.userAgent('Mozilla/5.0 (Linux; Android 4.0.4; Galaxy Nexus Build/IMM76B) AppleWebKit/535.19 (KHTML, like Gecko) Chrome/18.0.1025.133 Mobile Safari/535.19');
var url = casper.cli.args[0]; var outputPath = casper.cli.args[1];
casper.start(url);
casper.then(function() { casper.wait(5000, function() { // Get HTML var html = this.evaluate(function(){ returndocument.querySelector("html").outerHTML; });
// Save HTML fs = require('fs'); fs.write(outputPath, html, 'w'); } });
casper.run();
After that, if you run the command below, HTML of your target URL will be saved.
]]>
<p>It is a tips that you can use when you want to scrape a page using JavaScript.<br>Since <strong><a href="http://casperjs.org/" target="_blank" rel="noopener">CasperJS</a></strong> can be instaled easily by <code>npm</code>, it is recomended to use in sever side.</p>
PostgreSQL Tips [Data Size per Table, Reindex, NULLSLAST]https://blog.morizyun.com/blog/postgresql-reindex-null-last/2017-01-07T05:00:00.000Z2017-12-16T02:34:32.000ZWhile using PosgreSQL, this is my note which I learned.
Show data size per table/index in PostgreSQL
REINDEX command
Control sort with NULL
Show data size per table/index in PostgreSQL
While using PostgreSQL DB, sometimes you may want to know which table/index is using capacity.
SELECT pgn.nspname, relname, pg_size_pretty(relpages::bigint * 8 * 1024) ASsize, CASEWHEN relkind = 't'THEN (SELECT pgd.relname FROM pg_class pgd WHERE pgd.reltoastrelid = pg.oid) WHEN nspname = 'pg_toast'AND relkind = 'i'THEN (SELECT pgt.relname FROM pg_class pgt WHERESUBSTRING(pgt.relname FROM10) = REPLACE(SUBSTRING(pg.relname FROM10), '_index', '')) ELSE (SELECT pgc.relname FROM pg_class pgc WHERE pg.reltoastrelid = pgc.oid) END::varcharAS refrelname, CASEWHEN nspname = 'pg_toast'AND relkind = 'i'THEN (SELECT pgts.relname FROM pg_class pgts WHERE pgts.reltoastrelid = (SELECT pgt.oid FROM pg_class pgt WHERESUBSTRING(pgt.relname FROM10) = REPLACE(SUBSTRING(pg.relname FROM10), '_index', ''))) ENDAS relidxrefrelname, relfilenode, relkind, reltuples::bigint, relpages FROM pg_class pg, pg_namespace pgn WHERE pg.relnamespace = pgn.oid AND pgn.nspname NOTIN ('information_schema', 'pg_catalog') ORDERBY relpages DESC;
PostgreSQL seems to have unnecessary data remaining index unless you delete record well. If there is such kind of data, it is better to run REINDEX command, like this:
REINDEX { INDEX | TABLE | DATABASE | SYSTEM } name [ FORCE ]
Excellent tool pg_repack
It would be nice to use pg_repack which rebuilding a bloated table / index and rearranging records order to a specified index. It can run online because it does not keep locking.
]]>
<p>While using PosgreSQL, this is my note which I learned.</p>
<ul>
<li>Show data size per table/index in PostgreSQL</li>
<li>REINDEX command</li>
<li>Control sort with NULL</li>
</ul>
ESLint with React.js & ES6+https://blog.morizyun.com/blog/eslint-react-js-es6-plus/2017-01-03T05:00:00.000Z2017-12-16T02:34:32.000ZESLint is a static lint tool for JavaScript. Before running your code, the tool find obvious bug. In addtion, it helps to unify your code styles such as how to use parentheses and spaces, etc. In this article, I will explain the ESLint configuration for checking React.js written with ES6+.
Style Guide
Aribnb’s style guide is really great and easy to understand. ESLint also check your code based on the style guide.
overcommit is a git hook management tool which can execute various command before git commit, push or etc. The following configuration is how to use ESLint with overcommit.
At first, overcommit configuration like this:
# .overcommit.yml (Add following comfigugration) PreCommit: # Style Check for JavaScript EsLint: enabled:true command:['./client/node_modules/.bin/eslint','client/components/*','-c','client/.eslintrc.json'] include:'**/*.jsx'
Ater the configuration, execute bundle exec overcommit --sign, so ESLint will be executed automatically before git push.
Usage in wercker
The configuration of free CI wercker is as follows:
]]>
<p><a href="http://www.amazon.com/gp/product/B019HRGOPQ/ref=as_li_qf_sp_asin_il?ie=UTF8&camp=247&creative=1211&creativeASIN=B019HRGOPQ&linkCode=as2&tag=morizyun00-22" target="_blank" rel="noopener"><img border="0" src="http://ws.assoc-amazon.jp/widgets/q?_encoding=UTF8&ASIN=B019HRGOPQ&Format=_SL160_&ID=AsinImage&MarketPlace=JP&ServiceVersion=20070822&WS=1&tag=morizyun00-22" width="150" style="float: left; margin: 0 20px 20px 0;"></a><img src="http://www.assoc-amazon.jp/e/ir?t=morizyun00-22&l=as2&o=9&a=B019HRGOPQ" width="1" height="1" border="0" alt style="border:none !important; margin:0px !important;">ESLint is a static lint tool for JavaScript. Before running your code, the tool find obvious bug.<br>In addtion, it helps to unify your code styles such as how to use parentheses and spaces, etc.<br>In this article, I will explain the ESLint configuration for checking React.js written with ES6+.</p>
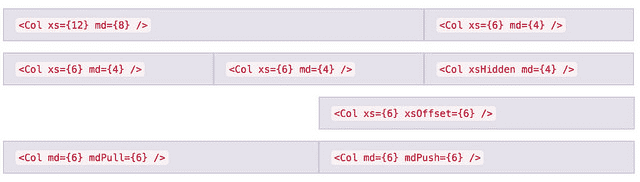
Wonderful react-bootstrap! We can use Bootstrap as a component!https://blog.morizyun.com/blog/react-bootstrap-javascript-css-framework/2017-01-02T05:00:00.000Z2017-12-16T02:34:32.000ZReact-Bootstrap is a library that can handle Bootstrap as a component of React.js. By using this you can build code with a sense of combining React.js components, not Bootstrap’s CSS. Also, as a whole your code becomes clearer, maintenance costs are suppressed as well!
Merit
A Whole code becomes clearer
We don’t need to remember Bootstrap CSS. We just build by React component.
When combining JS such as Modal can also be treated as a component
Installation
The following code is the library istallation command:
$ npm install react-bootstrap --save
Load CSS
[React-Bootstrap] (https://react-bootstrap.github.io) does not include Bootstrap CSS, so we need to load CSS by yourself. In my opinion, it is better to load CSS yourself because we can use our favorite theme. Also we can manage the CSS by npm.
<!-- Latest compiled and minified CSS --> <link rel="stylesheet" href="https://maxcdn.bootstrapcdn.com/bootstrap/latest/css/bootstrap.min.css">
]]>
<p><strong><a href="https://react-bootstrap.github.io" target="_blank" rel="noopener">React-Bootstrap</a></strong> is a library that can handle Bootstrap as a component of React.js.<br>By using this you can build code with a sense of combining React.js components, not Bootstrap’s CSS.<br>Also, as a whole your code becomes clearer, maintenance costs are suppressed as well!</p>
CSS-Modules with React.jshttps://blog.morizyun.com/blog/react-js-css-module/2017-01-01T05:00:00.000Z2017-12-16T02:34:32.000ZI would like to introduce react-css-modules with React.js. CSS-Module is a concept for seamless mapping of class names to CSS modules inside of React components.
]]>
<p>I would like to introduce <strong><a href="https://github.com/gajus/react-css-modules" target="_blank" rel="noopener">react-css-modules</a></strong> with React.js.<br>CSS-Module is a concept for seamless mapping of class names to CSS modules inside of React components.</p>
First Step for React.js on Railshttps://blog.morizyun.com/blog/react-js-on-rails-installation/2016-12-30T05:00:00.000Z2017-12-16T02:34:32.000ZThis article describes how to start React on Rails.
Instration Node with Mac Homebrew
brew upgrade brew install node
Creating React Sample App
npm install -g create-react-app create-react-app hello-world cd hello-world npm start
This is a script to use webpack in deploy process of ElasticBeansTalk. To use webpack you need to run npm install beforerake assets: precompile. (10 is depend on each environment, so please fix it.)
files: "/opt/elasticbeanstalk/hooks/appdeploy/pre/10_install_node_modules.sh": mode:"000744" owner:root group:root content:| #!/usr/bin/env bash set -xe EB_APP_STAGING_DIR=$(/opt/elasticbeanstalk/bin/get-config container -k app_staging_dir) cd $EB_APP_STAGING_DIR/client npm install encoding:plain
Special Thanks
This article has created by the following Japanese articles. Thank you very much, @r7kamura!
]]>
<p>This article describes how to start React on Rails.</p>
React.js Tips & Useful Component Set for beginnerhttps://blog.morizyun.com/blog/react-js-tips-useful-component/2016-12-29T05:00:00.000Z2017-12-16T02:34:32.000ZThis article describes React.js tips & useful componet for beginner.
Uncaught Invariant Violation: Objects are not valid as a React child (found: object with keys {...}). If you meant to render a collection of children, use an array instead or wrap the object using createFragment(object) from the React add-ons.